How To Patch Drywall: Complete How To Patch Drywall Guide

Drywall damage can happen anytime, from accidental holes to dents or cracks. Knowing how to patch drywall not only restores your wall’s appearance but also protects your home’s structural integrity. In this guide, you’ll find clear, practical steps paired with material and tool recommendations to make your repair both efficient and professional-looking. Whether you’re a homeowner tackling DIY projects or a remodeler seeking quick fixes, this guide is designed to empower you with the knowledge and confidence to restore your walls seamlessly.
What Is How To Patch Drywall?
Drywall patching involves cleaning damaged areas, applying patching materials, sanding smooth, and finishing with paint or texture. Small holes under 1/2 inch can be filled with spackle, while larger holes require drywall patches or mesh tape and joint compound. The process requires patience, proper materials, and the right tools to achieve a flawless finish. By mastering these steps, you can upgrade your walls, enhance your living space, and increase your home’s value with minimal cost and effort.
⚠️ Safety First
- Wear a dust mask and safety glasses when sanding or cutting drywall.
- Ensure good ventilation when using primers and paints.
- Keep tools out of reach of children during the repair process.
- Dispose of drywall dust and scraps properly to avoid respiratory issues.
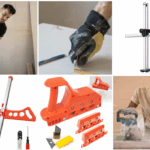
🛠 What You'll Need for How To Patch Drywall
Materials
- Joint Compound — essential for filling holes and smoothing surfaces
- Drywall Patch or Mesh Tape — used to cover holes larger than 1/2 inch
- Primer — prepares patched area for painting
- Sandpaper (120-220 grit) — for smoothing dried compound
- Paint — matches your existing wall color for finishing
Tools
- Putty Knife (4-6 inch) — for applying joint compound smoothly
- Drywall Saw or Utility Knife — to clean and shape damaged drywall
- Sanding Block or Sponge — for even sanding without gouging
- Paintbrush or Roller — to apply primer and paint
- Measuring Tape — ensures precise patch sizing
Step-by-Step Instructions
Step 1Prepare the Damaged Area⏱ ~30 min
Use a drywall saw or utility knife to remove any loose or damaged drywall around the hole. Cut the edges into a neat square or rectangle about 2 to 4 inches larger than the damaged area. This clean edge ensures a better patch fit and adhesion.
💡 Pro Tip: Wear a dust mask to avoid inhaling drywall dust during cutting.
Step 2Apply Drywall Patch or Mesh Tape⏱ ~20 min
For holes larger than 1/2 inch, apply a self-adhesive drywall patch or mesh tape over the cleaned hole. Ensure the patch fully covers the damaged area with at least 1 inch overlap on all sides.
💡 Pro Tip: Press firmly to avoid air bubbles under the patch for a smooth finish.
Step 3First Coat of Joint Compound⏱ ~60 min
Using a 4-6 inch putty knife, spread a thin layer of joint compound over the patch, feathering edges about 3 inches beyond the patch to blend with the wall surface. Allow it to dry completely, typically 24 hours.
💡 Pro Tip: Apply thin coats to prevent cracking and reduce sanding effort.
Step 4Sand and Apply Additional Coats⏱ ~90 min
Lightly sand the dried joint compound with 120-grit sandpaper to smooth rough edges. Apply a second, thinner coat extending further beyond the first to blend seamlessly. Repeat sanding and apply a third coat if needed for a perfectly smooth surface.
💡 Pro Tip: Use a sanding block to maintain an even surface and avoid gouges.
Step 5Prime the Patched Area⏱ ~30 min
Once the final coat is dry and sanded smooth, apply a primer to the patched area. This seals the joint compound and prepares the surface for paint, ensuring even color and texture.
💡 Pro Tip: Use a stain-blocking primer if repairing water-damaged drywall.
Step 6Paint to Match Existing Wall⏱ ~60 min
After the primer dries, paint the patched area with matching wall paint. Use a brush or roller to blend the patch with surrounding wall. Apply multiple coats if necessary for full coverage.
💡 Pro Tip: Feather paint edges to avoid visible lines between old and new paint.
💡 Pro Tips & Expert Advice
- Always clean the area thoroughly before patching to improve adhesion.
- Use a damp sponge for final sanding to reduce dust and achieve smoothness.
- Match the paint finish (matte, satin, semi-gloss) for a seamless look.
- Consider using a corner trowel for patching drywall corners for professional results.
- Allow ample drying time between coats to avoid cracking.
Frequently Asked Questions
- Q: Can I patch small nail holes with joint compound alone?
- A: Yes, small nail holes under 1/4 inch can be filled with joint compound or spackle without a patch.
- Q: How long does the drywall patching process take?
- A: Depending on drying times, expect around 4 hours spread over 2 days for complete patching and finishing.
- Q: Do I need to prime before painting over patched drywall?
- A: Yes, priming seals the joint compound and ensures even paint absorption and color.
- Q: Can I paint directly over mesh tape?
- A: No, mesh tape must be covered with joint compound first for a smooth surface before painting.
- Q: What if my patched area cracks after drying?
- A: This usually means the compound was applied too thick or dried too quickly. Sand and reapply thin coats for best results.
Mastering how to patch drywall is a valuable skill that saves you money and enhances your home's appearance. With the right materials, tools, and step-by-step approach outlined here, you can confidently repair holes and damage, creating smooth, flawless walls ready for your next design project. Remember, patience and attention to detail are key—take your time to prep, apply, sand, and finish correctly for professional results. Now, you’re ready to transform your walls and elevate your living space with ease.
Ready to get started?
Get a free quote from local professionals in your area.
⚠️ Disclosure: Some links in this guide are affiliate links. Architecture Adrenaline may earn a commission at no extra cost to you.
Design Deep Dives & Resources
Use these references to go deeper on layouts, materials, lighting, safety, and maintenance decisions that matter for this style.
Research-Backed Planning Notes
- Outdoor lighting should have a job: DOE frames outdoor residential lighting around aesthetics, security, and utility, with controls and shielding to reduce waste and glare. Layer low path lights, focused task lights, and shielded accent lights instead of flooding the entire patio with one harsh fixture. Source: U.S. Department of Energy
- Plant choice affects maintenance and longevity: UMN Extension emphasizes function, maintainability, environmental soundness, cost-effectiveness, and visual appeal in sustainable landscape design. Choose plants around sun, soil, mature size, and maintenance tolerance before choosing containers or furniture colors. Source: University of Minnesota Extension
- A good landscape behaves like connected rooms: USU Extension compares landscapes to outdoor rooms with different uses, volumes, circulation paths, and water needs. Use the cover, furniture layout, pavers, screens, and planting edges to define a room rather than scattering decor around the slab. Source: Utah State University Extension
- Wood performance is about moisture and detailing: The USDA Wood Handbook covers wood moisture, durability, fastenings, preservation, finishing, and material behavior for architects and engineers. Specify exterior-rated materials, drainage gaps, sealed end grain, and maintainable finishes before relying on a pretty stain sample. Source: USDA Forest Products Laboratory
On Architecture Adrenaline
- How to Fix a Crack in Drywall Like a Pro: Read the full guide
- How To Install Recessed Lighting In Existing Ceiling: Read the full guide
- Cut Drywall Like a Pro with These Essential Tips: Read the full guide
- Drywall Nail Pops: Causes, Fixes, and Prevention: Read the full guide
Authoritative Planning References
- International Code Council I-Codes - Use this as a starting point for code families, then verify the code edition adopted by the local building department.
- EPA Lead Renovation, Repair and Painting Program - Check before sanding, scraping, painting, or remodeling surfaces in pre-1978 homes or rental properties.
- U.S. Access Board ADA Accessibility Standards - Reference clearances, routes, thresholds, and reach ranges when accessibility or aging-in-place matters.
- Illuminating Engineering Society Standards - Professional lighting reference for terminology, visual comfort, glare, and application-specific lighting practice.
- American Society of Interior Designers - Professional interior design organization for design practice, wellness, sustainability, and industry context.
External Inspiration
Editor-Selected Amazon Finds
Use these shopping starting points to compare dimensions, weather ratings, and reviews before buying.
How To Patch Drywall lighting
Start with lighting because it changes how every finish reads.
How To Patch Drywall storage
Keeps the space functional instead of just photogenic.
How To Patch Drywall decor
Use restraint and repeat materials already in the room.
Extra Visual Inspiration