Applying acrylic stucco over existing stucco is a popular method for homeowners looking to refresh their exterior walls. This technique not only enhances the aesthetic appeal of a property but also provides improved resistance to moisture and temperature fluctuations. When considering this upgrade, it's important to evaluate the compatibility of materials, the current condition of the stucco, and the necessary preparation steps to ensure a lasting finish.
| Consideration | Description |
|---|---|
| Material Compatibility | Ensure that the existing stucco is compatible with acrylic stucco applications. |
| Current Condition | Assess the existing stucco for any damage such as cracks or moisture issues that need repair before application. |
| Preparation Steps | Properly clean and prime the surface to enhance the adhesion of the new acrylic stucco layer. |
Understanding the Benefits of Acrylic Stucco Overlays

Acrylic stucco is not just a facelift for your home; it’s an armor against the elements. By applying acrylic over existing stucco, you're effectively providing a shield that enhances weather resistance. Unlike traditional stucco, which can be porous, acrylic stucco creates a flexible barrier. This flexibility helps it resist cracking under temperature changes, making it a valuable addition for homes in areas with significant seasonal variations.
Moreover, acrylic stucco is more resistant to fading, ensuring vibrant curb appeal over time, which is something that standard stucco might struggle to maintain. This color resilience is a huge win for homeowners who take pride in their exterior aesthetics.
Step-by-Step Application Process
It's crucial to get hands-on with the prep work to make sure the acrylic stucco adheres properly. Here's a simple guide to walk you through the essentials:
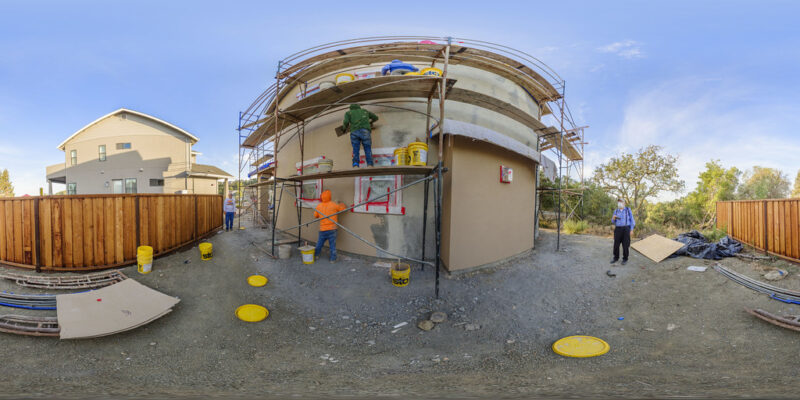
- Inspection: Before anything else, inspect your existing stucco for cracks or moisture issues. This step is non-negotiable, as any existing damage can compromise the new layer.
- Surface Cleaning: Remove any dust, dirt, or mildew from the stucco. A high-pressure wash can effectively clean the surface, but remember to give it ample time to dry before proceeding.
- Priming: After cleaning, apply a coat of primer specifically formulated for stucco applications. This will help the acrylic stucco bond more effectively and ensure a smooth final outcome.

Once these steps are ticked off, you’re ready for the stucco application. Use a trowel or a sprayer to evenly layer the acrylic stucco, following the manufacturer’s instructions for thickness and drying time.
Maintaining Your New Finish
To ensure longevity, maintenance plays a crucial role. Lucky for you, acrylic stucco is relatively low maintenance. Every couple of years, a gentle wash with mild soap and water can help maintain its sheen. Also, periodically check for any minor cracks or chips and repair them promptly to prevent larger issues down the line.
Consider applying a new coat of sealant every 5-7 years to keep your stucco in top-notch condition. This additional layer further fortifies the exterior against moisture and UV rays.
Intrigued by a stucco upgrade? Or perhaps you’ve already embraced this trend? Share your experiences or drop your questions in the comments below—let's chat about making exterior walls both beautiful and durable! Check out our recent articles for more insights and updates.
Watch Our Step-by-Step Guide on Applying New Stucco Finish Over Existing Surfaces
Improving your home's exterior doesn't have to be daunting. To help you better understand the process, check out this detailed video from Kirk Giordano Plastering Inc., where they demonstrate applying a new stucco finish over existing surfaces using essential tools and techniques.
What are the cons of acrylic stucco?
Because acrylic stucco forms a tight, non-permeable layer over existing stucco or masonry surfaces, it can trap moisture when not applied correctly. Over time, this trapped moisture may encourage mold, mildew, and even structural issues. Proper installation techniques and a well-prepared underlying surface are essential for minimizing moisture-related problems and ensuring the long-term success of your new finish.
How long will acrylic stucco last?
When properly installed and maintained, acrylic stucco can last up to 50 years or more. Its flexibility helps it tolerate slight shifts in the building, reducing the risk of cracks compared to traditional cement-based stucco. Factors such as climate, surface preparation, and regular upkeep play a large role in its lifespan. By periodically inspecting your acrylic stucco and addressing any issues early on, you can extend its durability and keep your home looking beautiful.
Applying acrylic stucco over existing stucco can be a game-changer for breathing new life into your home's exterior. It's a straightforward solution that not only refreshes the look of your property but also enhances the durability of your walls by providing better resistance to the elements. If you've been contemplating a home renovation project, this method is definitely worth considering. Whether you're looking to increase curb appeal or simply update the style with fresh, modern textures and colors, acrylic stucco offers a fantastic balance of practicality and aesthetics.
Stay Connected for More Inspiration
And hey, if you're as passionate about home improvement and design trends as I am, why not join a community of like-minded individuals? You can find endless inspiration and tips by following us on our social media channels. For daily ideas and updates, feel free to check out our Pinterest page. Let's inspire each other with creative transformation stories, and keep your DIY excitement alive! Whether you're planning a small update or a big overhaul, there’s plenty of inspiration out there to keep your projects fresh and stylish. Happy renovating!