Your bathroom exhaust fan plays a crucial role in removing moisture and odors, but over time dust and grime can clog it, reducing efficiency and potentially causing damage. Cleaning your bathroom exhaust fan is a straightforward project that anyone can tackle with the right approach and materials. In this guide, you’ll learn how to safely disassemble, clean, and reassemble your fan to keep it running smoothly and looking great. Let’s dive into the practical steps and styling insights that will inspire you to maintain your bathroom’s ventilation system like a pro.
Before You Start
Bathroom exhaust fans accumulate dust, lint, and moisture residue that can restrict airflow and cause unpleasant odors or mold growth. Regular cleaning not only improves air circulation but also extends the fan’s lifespan and enhances your bathroom’s overall hygiene. This guide provides detailed instructions on the materials and tools you’ll need, along with step-by-step directions to remove the cover, clean the motor and blades, and safely reinstall the unit. You’ll also find styling tips to refresh your fan’s appearance and integrate it seamlessly into your bathroom design.
⚠️ Safety First
- Always turn off power at the circuit breaker before working on electrical fixtures.
- Use a sturdy ladder or step stool to prevent falls when reaching ceiling fans.
- Avoid using excessive water near electrical components to prevent damage or shock.
- If you are unsure about electrical safety, consult a licensed electrician.
🛠 What You'll Need for How To Clean A Bathroom Exhaust Fan
Materials
- Microfiber cloths — for gentle dusting and wiping surfaces without scratching
- Dish soap — effective for degreasing fan components
- White vinegar — natural cleaner to remove mold and mildew
- Compressed air canister — to blow out dust from hard-to-reach areas
- Replacement filter or grille (optional) — if your fan has a filter or the grille is damaged
Tools
- Phillips screwdriver — to remove the fan cover and access internal parts
- Small brush (e.g., paintbrush or toothbrush) — to clean fan blades and motor housing
- Step ladder or sturdy stool — to safely reach ceiling fans
- Vacuum cleaner with brush attachment — for initial dust removal
Step-by-Step Instructions
Step 1 Turn off Power and Prepare Workspace ~10 min
Before you begin, switch off the bathroom exhaust fan at the circuit breaker to ensure safety. Set up a step ladder to comfortably reach the fan. Lay down a drop cloth or old towel beneath the fan to catch dust and debris.
💡 Pro Tip: Always verify the power is off using a non-contact voltage tester if you have one.
Step 2 Remove the Fan Cover ~10 min
Use a Phillips screwdriver to remove screws securing the fan cover or grille. Some covers may simply snap off; gently pull downward if no screws are visible. Set the cover aside for cleaning.
Step 3 Vacuum Dust and Debris ~15 min
Using the vacuum cleaner with a brush attachment, carefully remove dust from the fan blades, motor housing, and surrounding areas. Avoid disturbing electrical components.
💡 Pro Tip: Hold the fan blades steady to prevent them from spinning while vacuuming.
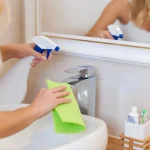
Step 4 Clean Fan Blades and Cover ~20 min
Mix warm water with a few drops of dish soap. Dip a microfiber cloth or small brush into the solution and gently clean the fan blades and cover. For mold or mildew, wipe surfaces with a cloth dampened with white vinegar. Rinse and dry thoroughly.
Step 5 Blow Out Remaining Dust ~10 min
Use a compressed air canister to blow out any dust lodged in crevices around the motor and fan housing. Hold the can upright and use short bursts to avoid moisture buildup.
Step 6 Replace or Clean Filter (If Applicable) ~10 min
If your fan has a filter, remove it and either clean or replace it according to manufacturer instructions. A fresh filter improves air quality and fan efficiency.
Step 7 Reassemble and Test ~10 min
Once all parts are dry, reattach the fan cover securely with screws or by snapping it back in place. Turn the power back on at the circuit breaker and test the fan to ensure it runs quietly and efficiently.
💡 Pro Tips & Expert Advice
- Schedule fan cleaning every 6 months to maintain optimal performance.
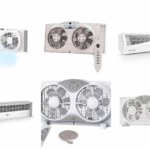
- Consider upgrading to a quieter, energy-efficient fan during your next bathroom remodel.
- Use a washable filter if available to reduce replacement costs.
- Keep a small handheld vacuum near your bathroom to quickly remove dust buildup before it accumulates.
Frequently Asked Questions
- How often should I clean my bathroom exhaust fan?
- It's best to clean it every 6 months to prevent dust buildup and maintain airflow.
- Can I use water to clean the fan motor?
- No, avoid getting the motor wet; use a dry cloth or compressed air for the motor area.
- What if my fan is making noise after cleaning?
- Check for loose screws or debris obstructing the blades. If noise persists, the motor may need professional servicing.
- Is it necessary to replace the fan filter?
- Yes, if your fan has a filter, replace or clean it regularly as per manufacturer guidelines to ensure efficient operation.
- Can I use the fan while cleaning it?
- No, always turn off power at the breaker before cleaning to avoid electrical hazards.
Cleaning your bathroom exhaust fan is a quick, affordable way to improve air quality and extend the life of your ventilation system. By following these step-by-step instructions and using the right tools and materials, you can maintain a fresh, mold-free bathroom environment effortlessly. Regular maintenance not only enhances your home’s comfort but also supports your interior design vision by keeping fixtures functional and attractive. Make fan cleaning part of your routine home care and enjoy a healthier, more inviting bathroom space.
Design Deep Dives & Resources
Use these references to go deeper on layouts, materials, lighting, safety, and maintenance decisions that matter for this style.
Research-Backed Planning Notes
On Architecture Adrenaline
- How To Increase Natural Light In Your Home: Read the full guide
Authoritative Planning References
External Inspiration
Editor-Selected Amazon Finds
Use these shopping starting points to compare dimensions, weather ratings, and reviews before buying.
Dimmable LED task lighting
A practical starting point for improving visibility and mood.
Water-resistant organizer
Useful when the design also needs daily function.
Non-slip accent rug
Adds texture while keeping maintenance realistic.
Extra Visual Inspiration