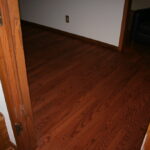
If you find that a stain is still tacky after a week, it might indicate an issue with the application or choice of stain. For someone experiencing this for the first time, such as the author who worked on a bookcase gifted by their girlfriend's dad, the frustration is understandable.  The process involved stripping the paint, sanding thoroughly, and applying the stain, yet the result was a sticky finish, indicating either too much stain was left on the surface or perhaps a problem with drying conditions. Resolving this involves understanding the nuances of stain application and potentially taking corrective measures to ensure a smooth finish.

| Possible Causes | Solutions | Notes |
|---|---|---|
| Excess Stain Build-up | Apply another coat, let soak, then wipe | Aids in removing previous layers |
| Improper Surface Preparation | Sand to bare wood, reapply stain | Ensures proper penetration |
| Weather or Bad Stain Batch | Use mineral spirits, re-stain | Ensure drying conditions are optimal |
Dealing with a sticky bookcase is never fun, especially when it’s a result of your handiwork. If your stain is still clinging to the wood in a gooey mess, you’ve possibly left too much stain behind or faced an uncooperative climate. When stains don't dry correctly, they leave that familiar tacky finish that can feel like a serious woodworking faux pas. But don’t stress; solutions are at hand!

One crucial point is that wood stains, especially penetrating oil stains, need to be applied thinly. Too thick a coat can prevent proper drying. If you find excess stain sitting on the surface, try this: add another coat of stain, let it soak briefly, and then wipe it away along with the residue left behind earlier. This may sound counterintuitive, but it helps lift the lingering stain off the wood.
Surface preparation is half the battle in achieving a rich, even stain. If you're experiencing issues, it might be a sign your wood wasn't sanded thoroughly. Proper sanding allows the stain to penetrate and bond with the wood fibers rather than sitting atop the surface. For a sticky stain, it's crucial to sand down to bare wood if necessary. When you reapply, ensure the area is smooth and free from any existing varnish or previous stain layers.
Sometimes, despite our best efforts, environmental factors refuse to cooperate. High humidity or low temperatures can severely impede the drying process of stains. In these situations, using mineral spirits could be your lifesaver. This not only helps remove excess stain but also prepares the wood for a fresh attempt under better conditions. As for how long the stain or subsequent finishes like polyurethane might take to dry, you can find a helpful complete timeline and tips here.
Here’s a quick rundown of steps to troubleshoot sticky stains:
Taking the time to correct a sticky stain problem can turn what seems like a disaster into a valuable learning experience. With a careful touch and the right conditions, your bookcase will be more than ready to display its contents.
If you’ve faced or conquered a similar sticky situation, please share your strategies and tips in the comments below. Your experiences could save the next woodworker from the same sticky mistake! For more insightful tips, check out some of our recent posts.
If you find that a stain is still tacky after a week, it might indicate an issue with the application or choice of stain. For someone experiencing this for the first time, such as the author who worked on a bookcase gifted by their girlfriend's dad, JB's DIY Garage offers a helpful video showing how to fix common beginner problems with sticky stains, including overapplication and stains that won't dry overnight.
If your stain still feels tacky after a long drying time, start by lightly sanding the surface with fine-grit sandpaper (around 220 grit). After sanding, wipe off all dust with a clean cloth. If the stickiness persists or you notice uneven color, consider reapplying the stain in a thinner coat. Make sure your workspace is warm, dry, and well-ventilated to prevent prolonged tackiness.
Drying times depend on the stain type, wood condition, and weather. Under optimal conditions, a fresh application can be dry to the touch in about 6 to 8 hours, although humidity or cooler temperatures may extend the process to several days. If your stain is still tacky after a week, it might indicate a thick application or insufficient ventilation.
A stain that refuses to dry usually suffers from lack of heat or poor air circulation. Cold or damp environments slow the curing process, so consider adding a heat source or waiting for warmer conditions. Overly thick coats can also remain sticky for longer than expected, so follow the product’s recommended thickness and drying guidelines.
Here’s a general timeline for different types of stain, including how soon it can safely weather rain and when it’s typically fully cured. Always consult your specific product’s instructions for the most accurate dry times.
Stain Type | Minimum Dry Time Before Rain | Ideal Full Curing Time
Oil-Based Stain | 12–24 hours | 24–72 hours
Water-Based Stain| 1–6 hours | 24–72 hours
Ready Seal® | 2–4 hours | 24–48 hours
Cabot Deck Stain | 6–24 hours | 24–72 hours
It can be frustrating when a project you put time and love into doesn’t turn out the way you expect, like tackling a beautiful bookcase handed down by someone special. Finding that the stain is still tacky after a week can be disheartening, but don’t worry—you're definitely not alone in this. It could be due to incomplete drying because of high humidity, an overly thick application, or even the type of stain used. Fortunately, these issues have solutions, and with a little patience and the right approach, you’ll likely achieve the beautiful finish you’re aiming for. Making adjustments, such as sanding off the tacky layer and allowing your space to be well-ventilated during the drying process, can make a big difference.
Remember, every DIY project is a learning experience, and sometimes the bumps along the way lead to the best stories. If you’re feeling stuck or need more inspiration, or perhaps just want to share your own project successes and challenges, I’d love for you to join our community. Let’s keep the creativity flowing; you can connect with us on social media where we share tips, project ideas, and more. Check out our latest posts on Pinterest for a treasure trove of ideas that might just spark your next great project. Let's continue this journey together, supporting and learning from each other along the way.
{"@context":"https://schema.org","@type":"BlogPosting","headline":"Sticky Stain Woes: Tacky After a Week","url":"https://www.architectureadrenaline.com/sticky-stain-woes-tacky-after-a-week/","datePublished":"2025-05-16T13:17:02-07:00","dateModified":"2026-05-15T18:08:38-07:00","author":{"@type":"Person","name":"Matt Thompson","sameAs":["https://www.linkedin.com/in/architectureadrenaline/","https://twitter.com/archiadrenaline"]},"image":{"@type":"ImageObject","url":"https://www.architectureadrenaline.com/wp-content/uploads/2025/05/photo-1606593972273-5e513661d625cropentropycstinysrgbfitmaxfmjpgixidM3w0MTYyODh8MHwxfHNlYXJjaHwxfHxibGVtaXNofGVufDB8fHx8MTc0NzQyNjUxMXwwixlibrb-4.1-400x600.jpg","width":1200,"height":630},"publisher":{"@type":"Organization","name":"Architecture Adrenaline","logo":{"@type":"ImageObject","url":"https://architectureadrenaline.com/wp-content/uploads/logo.png"}},"breadcrumb":{"@type":"BreadcrumbList","itemListElement":[{"@type":"ListItem","position":1,"name":"Home","item":"https://architectureadrenaline.com/"},{"@type":"ListItem","position":2,"name":"Sticky Stain Woes: Tacky After a Week","item":"https://www.architectureadrenaline.com/sticky-stain-woes-tacky-after-a-week/"}]},"mainEntityOfPage":{"@type":"WebPage","@id":"https://www.architectureadrenaline.com/sticky-stain-woes-tacky-after-a-week/"}}
{"@context":"https://schema.org","@type":"FAQPage","mainEntity":[{"@type":"Question","name":"Tackling Tacky Stain: The Nitty-Gritty","acceptedAnswer":{"@type":"Answer","text":"Dealing with a sticky bookcase is never fun, especially when it’s a result of your handiwork. If your stain is still clinging to the wood in a gooey mess, you’ve possibly left too much stain behind or faced an uncooperative climate. When stains don't dry correctly, they leave that familiar tacky finish that can feel like a serious woodworking faux pas. But don’t stress; solutions are at hand!"}},{"@type":"Question","name":"Prepping for Perfect Penetrationnnnn "scratch water stain" by clive sax is licensed under CC BY-NC-SA 2.0. .nnnSurface preparation is half the battle in achieving a rich, even stain. If you're experiencing issues, it might be a sign your wood wasn't sanded thoroughly. Proper sanding allows the stain to penetrate and bond with the wood fibers rather than sitting atop the surface. For a sticky stain, it's crucial to sand down to bare wood if necessary. When you reapply, ensure the area is smooth and free from any existing varnish or previous stain layers.nnWeather Woes and Solution Savvy","acceptedAnswer":{"@type":"Answer","text":"Sometimes, despite our best efforts, environmental factors refuse to cooperate. High humidity or low temperatures can severely impede the drying process of stains. In these situations, using mineral spirits could be your lifesaver. This not only helps remove excess stain but also prepares the wood for a fresh attempt under better conditions. As for how long the stain or subsequent finishes like polyurethane might take to dry, you can find a helpful complete timeline and tips here."}},{"@type":"Question","name":"Ready to Restore?","acceptedAnswer":{"@type":"Answer","text":"Taking the time to correct a sticky stain problem can turn what seems like a disaster into a valuable learning experience. With a careful touch and the right conditions, your bookcase will be more than ready to display its contents. nn "Old Navy 12-18M cardigan. Some minor discoloration on white placket by buttons. oxiclean should work on it! $4 plus ship. Leave PayPal and zip to claim!" by Fuschia Foot is licensed under CC BY-NC-ND 2.0. .n If you’ve faced or conquered a similar sticky situation, please share your strategies and tips in the comments below. Your experiences could save the next woodworker from the same sticky mistake! For more insightful tips, check out some of our recent posts."}}]}


Immerse yourself in architecture’s most boundary-pushing ideas—where innovative home improvements meet visionary urban developments. Discover new building techniques, materials, and creative concepts that are redefining how we shape our spaces on a global scale.
