
Repairing spalling concrete effectively begins with understanding the root causes of spalling, which commonly include freeze-thaw cycles, moisture intrusion, and improper installation practices. Surfaces like driveways, patios, and sidewalks are susceptible, and addressing spalling promptly is crucial to maintain structural integrity and enhance visual appeal. Utilizing products like Rapid Set NewCrete and following systematic repair steps can restore your concrete surfaces efficiently.

| Step | Description | Tools/Materials Needed |
|---|---|---|
| 1. Clean Surface | Use a pressure washer to remove dirt, dust, and debris. | Pressure washer |
| 2. Mix Resurfacer | Combine resurfacing product with water until smooth like pancake batter. | Cordless drill with paddle-type mixer |
| 3. Pre-fill Cracks | Use the mixed compound to fill cracks and holes. | Resurfacing compound |
| 4. Apply and Spread | Pouring and evenly spreading the compound to desired thickness. | Long-handled squeegee |
| 5. Curing | Mist the area if necessary to assist curing in dry conditions. | Water mist spray |

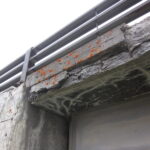
Concrete spalling is more than just a surface issue—it's a sign of underlying problems that might escalate if ignored. The process starts when moisture intrudes into the concrete, often expanding when frozen, causing the surface layer to flake off. While harsh freeze-thaw cycles are notorious culprits, improper installation practices and the use of low-quality concrete or deicing salts play significant roles too. Fortunately, understanding these causes allows for effective prevention.
To avert spalling, regular maintenance is vital. This includes:
These steps can dramatically reduce the chances of spalling, keeping your concrete surfaces looking and performing their best.

The good news is that dealing with spalling doesn't necessarily require tearing out and replacing entire sections of concrete. Here’s a step-by-step guide to efficiently repairing these issues using the table as a quick reference for tools and materials:
First, clean the affected area thoroughly with a pressure washer to remove all debris, dirt, and dust. This is crucial for ensuring that the repair materials adhere properly. Next, prepare the resurfacing product—something like Rapid Set NewCrete is recommended for its quick curing time and ease of application. Mix it with water using a cordless drill with a paddle-type mixer until it reaches a smooth consistency reminiscent of pancake batter.
With your mixture ready, pre-fill any visible cracks or holes on the surface. This helps in achieving an even application when you spread the resurfacer. Next, pour and spread the resurfacer using a long-handled squeegee, ensuring it covers the spalled area evenly. Aim for a thickness of about an eighth of an inch to guarantee robust repairs. In particularly dry or windy conditions, mist the area lightly to help with curing.
For more technical insights into concrete maintenance and repairs, look into the comprehensive article on Concrete Defects: Causes, Prevention and Solutions.

While repairing spalled concrete safeguards your investment now, future-proofing it is just as crucial. Preventive measures like applying a high-quality sealer regularly and maintaining drainage systems can go a long way. Pay particular attention to areas susceptible to water aggregation and freeze-thaw effects.
Got any tips or experiences in repairing spalling concrete? Join the conversation in the comments. Your insights could be just what others need to perfect their concrete repair projects! Additionally, explore our recent articles for the newest discussions and content.
Repairing spalling concrete effectively begins with understanding the root causes of spalling, which commonly include freeze-thaw cycles, moisture intrusion, and improper installation practices. For a practical demonstration, check out this video by Mike Day Concrete (Everything About Concrete) where he shows you how to resurface spalled concrete.
V-SEAL’s advanced deep-penetrating formula is highly effective for preventing spalling, as it passes the rigorous ASTM 100-day freeze/thaw test. Unlike many acrylic-based sealers that trap moisture, V-SEAL allows the concrete to breathe, helping preserve its strength and integrity.
A range of materials can be used to restore spalled concrete, including traditional Portland cement patching compounds, rapid-strength proprietary mixes, and polymer options such as epoxy, methyl methacrylate, or polyurethane. Although bituminous patches have been tried, they generally serve only as a temporary solution, especially in areas exposed to heavy traffic or extreme weather.
Yes, you can apply epoxy after repairing spalled concrete, as long as the surface is properly prepared and leveled. Cleaning away debris, addressing the damaged areas, and ensuring a stable base are vital for lasting adhesion. Using a high-quality penetrating sealer before the epoxy coating can further strengthen the concrete, boosting durability against future spalling.
Spalling doesn’t just affect the appearance of concrete—it also undermines structural safety by allowing moisture and contaminants to penetrate more deeply over time. Left unaddressed, spalling can escalate, increasing repair expenses and posing potential hazards to foundations, driveways, and any load-bearing structures.
Repairing spalling concrete doesn't have to be an overwhelming task, and with the steps we've outlined, you'll find it more manageable than you might expect. By identifying the root causes such as freeze-thaw cycles, moisture intrusion, or improper installation, you can choose the right repair method and products to ensure a longer-lasting fix. Whether you're dealing with driveways, patios, or sidewalks, addressing spalling not only improves the aesthetic appeal of your spaces but also enhances their safety and durability. Remember, taking the time to protect your work with a good sealant will go a long way in preventing future issues.
We hope this guide helps you tackle your spalling concrete project with confidence. If you have any questions or need more tips, don’t hesitate to reach out. Feel free to share your before and after photos with us on our social media; we’d love to see your successful repairs! For more inspiration and updates on home improvement and architecture, make sure to follow us on Instagram. We’re always here to support your DIY journey and share new ideas to make your home more beautiful and functional. Thanks for stopping by, and happy fixing!
{"@context":"https://schema.org","@type":"BlogPosting","headline":"How to Repair Spalling Concrete: Complete Guide","url":"https://www.architectureadrenaline.com/how-to-repair-spalling-concrete-complete-guide/","datePublished":"2025-06-05T21:00:55-07:00","dateModified":"2026-05-15T18:08:40-07:00","author":{"@type":"Person","name":"Matt Thompson","sameAs":["https://www.linkedin.com/in/architectureadrenaline/","https://twitter.com/archiadrenaline"]},"image":{"@type":"ImageObject","url":"https://www.architectureadrenaline.com/wp-content/uploads/2025/06/42223630094_967c955c1e_b-800x600.jpg","width":1200,"height":630},"publisher":{"@type":"Organization","name":"Architecture Adrenaline","logo":{"@type":"ImageObject","url":"https://architectureadrenaline.com/wp-content/uploads/logo.png"}},"breadcrumb":{"@type":"BreadcrumbList","itemListElement":[{"@type":"ListItem","position":1,"name":"Home","item":"https://architectureadrenaline.com/"},{"@type":"ListItem","position":2,"name":"How to Repair Spalling Concrete: Complete Guide","item":"https://www.architectureadrenaline.com/how-to-repair-spalling-concrete-complete-guide/"}]},"mainEntityOfPage":{"@type":"WebPage","@id":"https://www.architectureadrenaline.com/how-to-repair-spalling-concrete-complete-guide/"}}
{"@context":"https://schema.org","@type":"FAQPage","mainEntity":[{"@type":"Question","name":"Understanding and Preventing SpallingnnnnConcrete spalling is more than just a surface issue—it's a sign of underlying problems that might escalate if ignored. The process starts when moisture intrudes into the concrete, often expanding when frozen, causing the surface layer to flake off. While harsh freeze-thaw cycles are notorious culprits, improper installation practices and the use of low-quality concrete or deicing salts play significant roles too. Fortunately, understanding these causes allows for effective prevention.nnTo avert spalling, regular maintenance is vital. This includes:nn Sealing the surface to prevent water infiltration.n Inspecting and repairing any cracks promptly. For instance, if you're dealing with flagstone patios, you can learn how to Repair Flagstone Patio Cracks Fast.n Avoiding the use of deicing salts, which can exacerbate the problem. For more ideas on maintaining concrete surfaces, check The Ultimate Guide to Concrete Porch Ideas.n Ensuring proper drainage around concrete structures to reduce water exposure.n Opting for professional installation to ensure quality and durability.nnThese steps can dramatically reduce the chances of spalling, keeping your concrete surfaces looking and performing their best.nnn n "Concrete spalling caused by oxide jacking at the Herbst Pavilion, Fort Mason Center, San Francisco" by Cullen328 (Jim Heaphy) is licensed under CC BY-SA 3.0. To view a copy of this license, visit https://creativecommons.org/licenses/by-sa/3.0/.nnnRepairing Spalling Concrete: Step-by-Step","acceptedAnswer":{"@type":"Answer","text":"The good news is that dealing with spalling doesn't necessarily require tearing out and replacing entire sections of concrete. Here’s a step-by-step guide to efficiently repairing these issues using the table as a quick reference for tools and materials:"}},{"@type":"Question","name":"Future-Proofing Your Concrete Surfaces","acceptedAnswer":{"@type":"Answer","text":"While repairing spalled concrete safeguards your investment now, future-proofing it is just as crucial. Preventive measures like applying a high-quality sealer regularly and maintaining drainage systems can go a long way. Pay particular attention to areas susceptible to water aggregation and freeze-thaw effects."}}]}

Immerse yourself in architecture’s most boundary-pushing ideas—where innovative home improvements meet visionary urban developments. Discover new building techniques, materials, and creative concepts that are redefining how we shape our spaces on a global scale.
