Learning how to broom finish concrete can enhance both the functionality and aesthetics of your outdoor spaces, offering a slip-resistant and durable surface perfect for high-traffic areas like patios and driveways. By carefully timing the process, using the right tools, and choosing the appropriate broom materials, you can achieve a finish that not only provides essential traction but also stands the test of time.

| Pros | Cons | Best Practices |
|---|---|---|
| Slip resistance | Roughness on bare feet | Use a magnesium float for smoothing |
| Affordability | Less decorative appeal | Wait for bleed water to evaporate before finishing |
| Ease of application | Potential dirt or debris entrapment | Use uniform broom strokes |
| Durability | Color variations | Regular maintenance like sweeping and pressure washing |

Mastering the timing of broom finishing concrete is akin to becoming an artist with a brush—precision is key. This involves waiting for the perfect moment when the concrete slab's surface is firm enough to resist a push yet soft enough to imprint with a broom. It's a delicate balance, as starting too early could lead to a mucky surface, while waiting too long might result in a texture that won't hold the design you want. A tell-tale sign is when bleed water has completely evaporated from the surface—a clear indicator that you're ready to begin.
Selecting the proper broom is pivotal to achieving the desired finish. With a variety of materials like horsehair, nylon, or polypropylene, each broom type offers a unique texture. For most applications, natural or synthetic stiff bristle brooms work wonders, ensuring a clear and consistent texture. The process begins with pouring the slab and smoothing it with a magnesium float. After waiting for the bleed water to evaporate, the fun begins: pulling the broom evenly across the surface to create the traction you need.
In pursuit of both ease and effectiveness, innovative tools like the Auto Glide have been developed to improve the broom finishing process. This tool maximizes efficiency and provides a more seamless finish, especially in larger projects. Moreover, using slip-resistant broom-finished overlays like Ultra Surface or Concrete Renew can significantly enhance safety. These overlays are perfect for areas where extra grip is necessary.
Maintaining the beauty and functionality of a broom-finished concrete surface requires regular upkeep. Ensure you keep surfaces clean by sweeping and pressure washing periodically to remove dirt and grime. Reapplication of a cure-and-seal product helps maintain its durability and appearance, while promptly repairing any cracks will keep your surface sound. Regular maintenance not only extends the lifespan of the concrete but also preserves its aesthetic appeal.
While broom finishes might lack the decorative appeal of stamped concrete, you can still get creative. Using colored concrete provides a subtle yet visually appealing twist, adding a touch of personality to your outdoor spaces. Alternatively, combine areas of broom-finished concrete with decorative stamps in less trafficked regions. This sets off a unique visual contrast but ensures essential traction where it's needed most. Embrace these design opportunities to create stunning outdoor spaces that speak to your style.
Would you like more tips on enhancing your concrete projects or have experience to share? Leave a comment below—we'd love to hear your thoughts and ideas! Feel free to explore our recent articles for more inspiration.
Learning how to broom finish concrete can enhance both the functionality and aesthetics of your outdoor spaces, offering a slip-resistant and durable surface perfect for high-traffic areas like patios and driveways. By carefully timing the process, you can achieve a professional-grade finish. To see this process in action, check out the video below from Odell Complete Concrete:
Broom finishing is most effective once your concrete slab has partially set but still retains enough moisture on the surface. This stage typically begins anywhere from 30 minutes to a few hours after pouring, depending on temperature and humidity. Experienced contractors rely on site conditions—and a bit of intuition—to decide the right moment to create that ideal slip-resistant texture.
Yes, you can achieve a basic textured surface by bull floating your wet concrete and then applying a broom finish. However, it’s important not to overwork exterior slabs; excessive troweling can weaken the surface. For a slightly smoother texture, some pros take an extra pass with a wood or magnesium float before using a broom—once all bleed water has evaporated.
While a broom finish enhances traction and safety, it may limit decorative options compared to stamped or stained concrete. The textured surface can also collect dirt more easily, meaning you’ll need regular cleaning and maintenance to keep it looking fresh and appealing.
HOW TO FINISH CONCRETE: STEP-BY-STEP
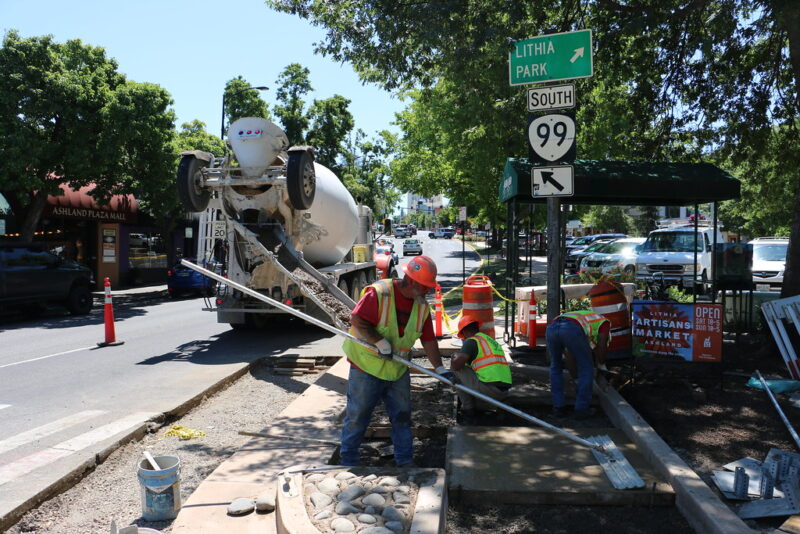
1. Step 1 – Pour the Concrete: Place the concrete mix and use a shovel to distribute it evenly.
2. Step 2 – Strike Off the Concrete: Use a straightedge or screed board to level off the surface.
3. Step 3 – Float the Concrete: Smooth out the slab with a bull float, working out any surface irregularities.
4. Step 4 – Trim the Edges: Use an edging tool to shape and clean up the sides of your slab or steps.
5. Step 5 – Create Control Joints: Use a groover to cut control joints at set intervals to help prevent cracks.
6. Step 6 – Apply a Troweled, Broom, or Stamped Finish: Once the bleed water has evaporated, choose your finish. For a broom finish, pull a clean broom across the surface to create a uniform texture.
7. Step 7 – Cure the Concrete: Protect your work with a curing compound or cover it with plastic sheeting to lock in moisture and allow the concrete to strengthen.
In wrapping up this journey into the art of broom finishing concrete, it's clear that a well-executed finish can transform your outdoor space into something special. Not only does it provide a slip-resistant surface that adds safety to high-traffic areas, but it also contributes a stylish touch that withstands the test of time and use. Remember, the key to success is timing—the concrete needs to reach the right level of firmness before you start brooming. Once you strike that balance, you'll find that broom finishing is both a rewarding and attainable DIY project.
If you're feeling inspired to tackle your own concrete finishing project or want to dive deeper into home improvement tips, staying connected with a community of like-minded enthusiasts is invaluable. I love sharing more ideas and seeing your projects come to life on social media. So don't hesitate to check us out and share your journey on our Instagram page. It's the perfect place to get fresh inspiration, stay updated on the latest trends, and exchange tips and tricks with others who share your passion. Happy concrete finishing, and I can’t wait to see what you create!
{"@context":"https://schema.org","@type":"BlogPosting","headline":"How to Achieve a Broom Finish","url":"https://www.architectureadrenaline.com/how-to-achieve-a-broom-finish/","datePublished":"2025-05-20T01:36:33-07:00","dateModified":"2026-05-15T18:08:38-07:00","author":{"@type":"Person","name":"Matt Thompson","sameAs":["https://www.linkedin.com/in/architectureadrenaline/","https://twitter.com/archiadrenaline"]},"image":{"@type":"ImageObject","url":"https://www.architectureadrenaline.com/wp-content/uploads/2025/05/8717573260_68dfeff8ed_b-450x600.jpg","width":1200,"height":630},"publisher":{"@type":"Organization","name":"Architecture Adrenaline","logo":{"@type":"ImageObject","url":"https://architectureadrenaline.com/wp-content/uploads/logo.png"}},"breadcrumb":{"@type":"BreadcrumbList","itemListElement":[{"@type":"ListItem","position":1,"name":"Home","item":"https://architectureadrenaline.com/"},{"@type":"ListItem","position":2,"name":"How to Achieve a Broom Finish","item":"https://www.architectureadrenaline.com/how-to-achieve-a-broom-finish/"}]},"mainEntityOfPage":{"@type":"WebPage","@id":"https://www.architectureadrenaline.com/how-to-achieve-a-broom-finish/"}}
{"@context":"https://schema.org","@type":"FAQPage","mainEntity":[{"@type":"Question","name":"The Art of Timing","acceptedAnswer":{"@type":"Answer","text":"Mastering the timing of broom finishing concrete is akin to becoming an artist with a brush—precision is key. This involves waiting for the perfect moment when the concrete slab's surface is firm enough to resist a push yet soft enough to imprint with a broom. It's a delicate balance, as starting too early could lead to a mucky surface, while waiting too long might result in a texture that won't hold the design you want. A tell-tale sign is when bleed water has completely evaporated from the surface—a clear indicator that you're ready to begin."}},{"@type":"Question","name":"The Right Tools and Techniques","acceptedAnswer":{"@type":"Answer","text":"Selecting the proper broom is pivotal to achieving the desired finish. With a variety of materials like horsehair, nylon, or polypropylene, each broom type offers a unique texture. For most applications, natural or synthetic stiff bristle brooms work wonders, ensuring a clear and consistent texture. The process begins with pouring the slab and smoothing it with a magnesium float. After waiting for the bleed water to evaporate, the fun begins: pulling the broom evenly across the surface to create the traction you need."}},{"@type":"Question","name":"Innovative Solutions and Safety","acceptedAnswer":{"@type":"Answer","text":"In pursuit of both ease and effectiveness, innovative tools like the Auto Glide have been developed to improve the broom finishing process. This tool maximizes efficiency and provides a more seamless finish, especially in larger projects. Moreover, using slip-resistant broom-finished overlays like Ultra Surface or Concrete Renew can significantly enhance safety. These overlays are perfect for areas where extra grip is necessary."}},{"@type":"Question","name":"Care and Maintenance","acceptedAnswer":{"@type":"Answer","text":"Maintaining the beauty and functionality of a broom-finished concrete surface requires regular upkeep. Ensure you keep surfaces clean by sweeping and pressure washing periodically to remove dirt and grime. Reapplication of a cure-and-seal product helps maintain its durability and appearance, while promptly repairing any cracks will keep your surface sound. Regular maintenance not only extends the lifespan of the concrete but also preserves its aesthetic appeal."}},{"@type":"Question","name":"Combining Function with Flair","acceptedAnswer":{"@type":"Answer","text":"While broom finishes might lack the decorative appeal of stamped concrete, you can still get creative. Using colored concrete provides a subtle yet visually appealing twist, adding a touch of personality to your outdoor spaces. Alternatively, combine areas of broom-finished concrete with decorative stamps in less trafficked regions. This sets off a unique visual contrast but ensures essential traction where it's needed most. Embrace these design opportunities to create stunning outdoor spaces that speak to your style."}},{"@type":"Question","name":"Video Tutorial: How to Broom Finish a Concrete Slab","acceptedAnswer":{"@type":"Answer","text":"Learning how to broom finish concrete can enhance both the functionality and aesthetics of your outdoor spaces, offering a slip-resistant and durable surface perfect for high-traffic areas like patios and driveways. By carefully timing the process, you can achieve a professional-grade finish. To see this process in action, check out the video below from Odell Complete Concrete:"}}]}


Immerse yourself in architecture’s most boundary-pushing ideas—where innovative home improvements meet visionary urban developments. Discover new building techniques, materials, and creative concepts that are redefining how we shape our spaces on a global scale.
